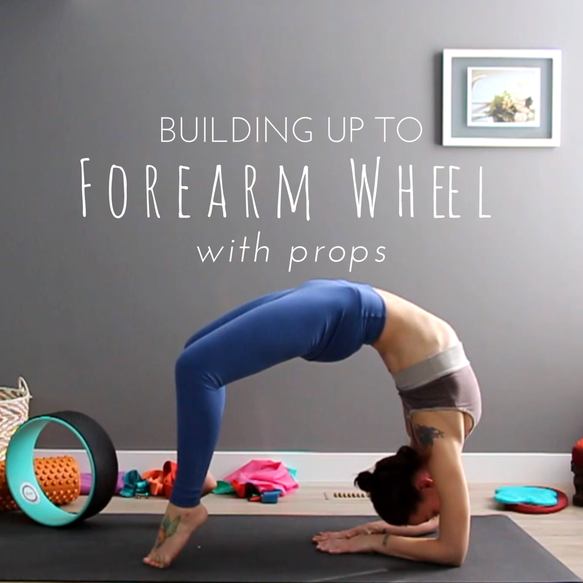
 FOREARM WHEEL POSE; Dwi Pada Viparita DandasanaI recently decided to do this asana tutorial because Forearm Wheel has been showing up more frequently in my practice lately, as well as being requested by my students as a peak asana to work up to in their private sessions. This tutorial requires some yoga props, but most things are easily substituted with similar household items; however, you will need a yoga wheel for this particular entry into the pose. I have two: the one you see in these photos is a Dharma Yoga Wheel, and I believe it was also the first on the market. {You can learn more about it and purchase one for yourself here. With shipping to Canada, it'll cost around $100-150 CAD.} I actually got this one as a birthday gift a few years ago (thanks mom!) and have used it regularly ever since. I recently bought another yoga wheel from Winners so that I can use this prop more effectively while teaching pairs. I have no idea what brand it is, but it cost $40, feels a little lighter than the Dharma Wheel, but appears to work just as well (I've just had it for a couple of weeks so far). The other props I'm using in this tutorial are a resistance band and a foam roller, but are totally optional. If you don't have a resistance band, you can use any sort of strap/belt/scarf etc. that you can hold wider than your hips and create some tension with. If you don't have a foam roller, I feel sad for you. Just kidding! (But, I have found this to be a very worthwhile investment.) You can skip this step, or maybe grab a tennis ball and roll around on that a little to release tension in your back, neck, shoulders and hips. This is a full-body backbend! It requires quite a bit of opening, and lots of love. 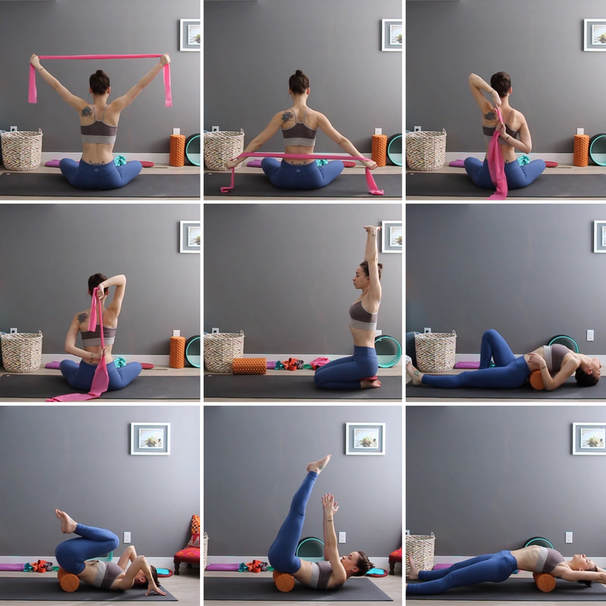 Warming Up The Body For A Deep BackbendThe first two squares show me "shoulder flossing". (Weird name, awesome exercise.) With a resistance band or other strap, sit tall and hold the strap quite a bit wider than the width of your hips (you can try one round and adjust your grip if you haven't gotten it quite right on the first attempt.) With a deep inhale, slowly reach the strap forward and up over your head, keeping wrists straight and shoulders square. Engage your core, and as you exhale, slowly bring the band behind your head and down toward the floor, maintaining proper alignment throughout the range of motion. On the next inhale, reverse the process, bringing the band back up and over your head, and down to your lap with the exhale. {Repeat 4-5x} The next two squares are assisted Cow Face (Gomukhasana) arms. I don't actually need the strap for this, but I like using it to strengthen my chest and shoulders even more by pulling in opposite directions. Start by bringing the strap into one hand and stretching that arm up toward the ceiling on an inhalation. On your exhale, bend at the elbow and reach between your shoulder blades. With another deep breath, swing the other arm out and around your back with palm facing out; grab the strap as close to your top hand as you're comfortable with. Keep your shoulders square, chest lifted, and core engaged. Stretch the strap or reach elbows in opposite directions with fingers clasped to open even more deeply through the chest, upper back and shoulders. Make sure you're maintaining steady breath in and out through your nose! {Hold for 3-5 breaths, each side.} The middle square is a palm press in Hero. I've got a little yoga pad in there for some extra hip/bum support, but you can absolutely do this without, or alternatively with toes tucked for extra foot stretching, or sitting on a block/pillow for added support through the hips and knees. Sit tall with a long spine and interlace your fingers in front of your chest. With an inhale, rotate your palms outward in front of you, and bring your arms up and back toward your ears. If you have a lot of tension in the shoulders, you might soften your arms slightly and bend at the elbows as much as needed. If you're feeling pretty good here, stretch your arms back even further for more front-side opening. {Hold as long as you'd like, or 3-5 deep breaths.} The final four squares show me getting acquainted with the foam roller. (The one I've got here is Gaiam, and I bought it at Rexall for around $30-40. You can get one directly from their site for $20.99 right now, but I'm not sure of shipping costs.) To be honest, I don't really have any pro tips for this one! My best advice is to make sure you're breathing deeply as you move (or stay in one spot) and bring your awareness into the subtle layers of your body to discover where you most need the attention. {Roll about for as long as you please!} 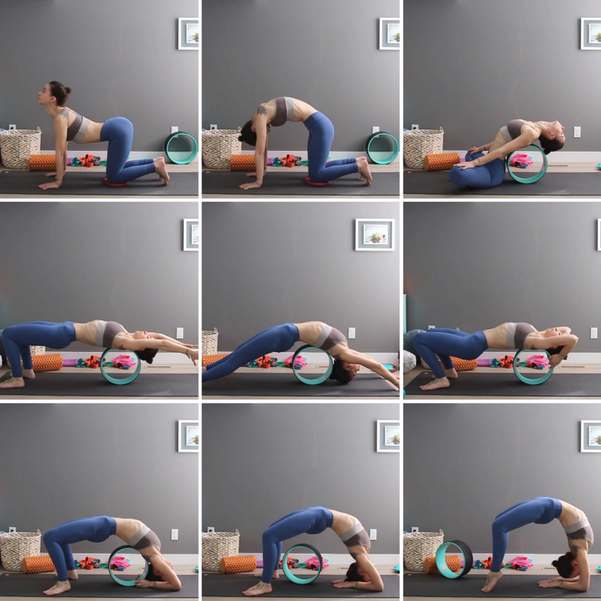 Using a Yoga Wheel to build your Forearm Wheel**Before we go further, I just want to add that this is a fairly advanced backbend and you should feel reasonably ready to bring your body into this position before giving it a go. Don't panic if you don't get lift-off at first! Just keep working on building it up, bit by bit, until eventually you find yourself in the full expression of the pose.** The first two squares show your basic Cat-Cow tilts. You do these from a Table Top position, in synchronization with the breath. Rooting down through the hands and knees, inhale to come into Cow Pose, lifting the hips, relaxing your belly down, drawing the chest forward and looking up. As you exhale, slowly move into Cat Pose, rounding your spine and looking up at the belly. Be mindful to move as fluidly as possible. {Repeat 4-5x} The next square is a supported heart-opener. Grab your yoga wheel and come to a seated position. Press the wheel into your sacrum in line with your spine, and take a deep breath to find as much extension as possible. As you exhale, *lengthen your spine over the wheel, dropping your head back as much as you're comfortable with through the neck. Root down through the sits bones and base of the spine and breathe deeply into the entirety of your lungs, using the breath to expand the front side of the body. Bring your arms where you like them, shoulders relaxed. Stay as long as you feel supported. *I use these words intentionally; it's easy to sort of collapse onto the wheel, but we're trying to create as much space as possible between the spinal discs to avoid compression as we deepen the bend. The next two squares show me giving my spine and back-body some love with the wheel. Just as with the foam roller, move intuitively, using your breath to guide you. (And make sure to keep the wheel along your spine so you don't fall off to the side!) The next four squares are broken down in more detail below: 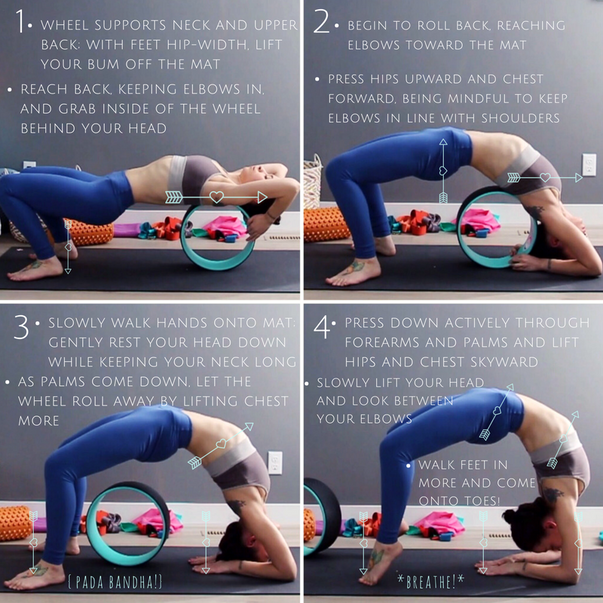 Climbing the Peak: Getting Into Forearm WheelFollow the basic steps outlined in the above graphic, keeping these things in mind:
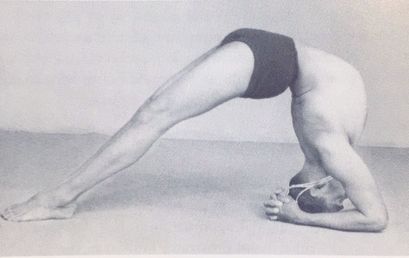 BKS Iyengar demonstrating Dwi Pada Viparita Dandasana Remember to go at your own pace, stay with your breath, and always maintain proper alignment while seeking more depth.
If you have any questions, send them to me here! And if you haven't yet, check out the Heart Opening sequence in my Online Studio, where you can always practice for free. I hope you've enjoyed this tutorial!
0 Comments
Your comment will be posted after it is approved.
Leave a Reply. |
